
Spooky Sewalong Part V: The Final Chapter

Guest written by Jane Youn
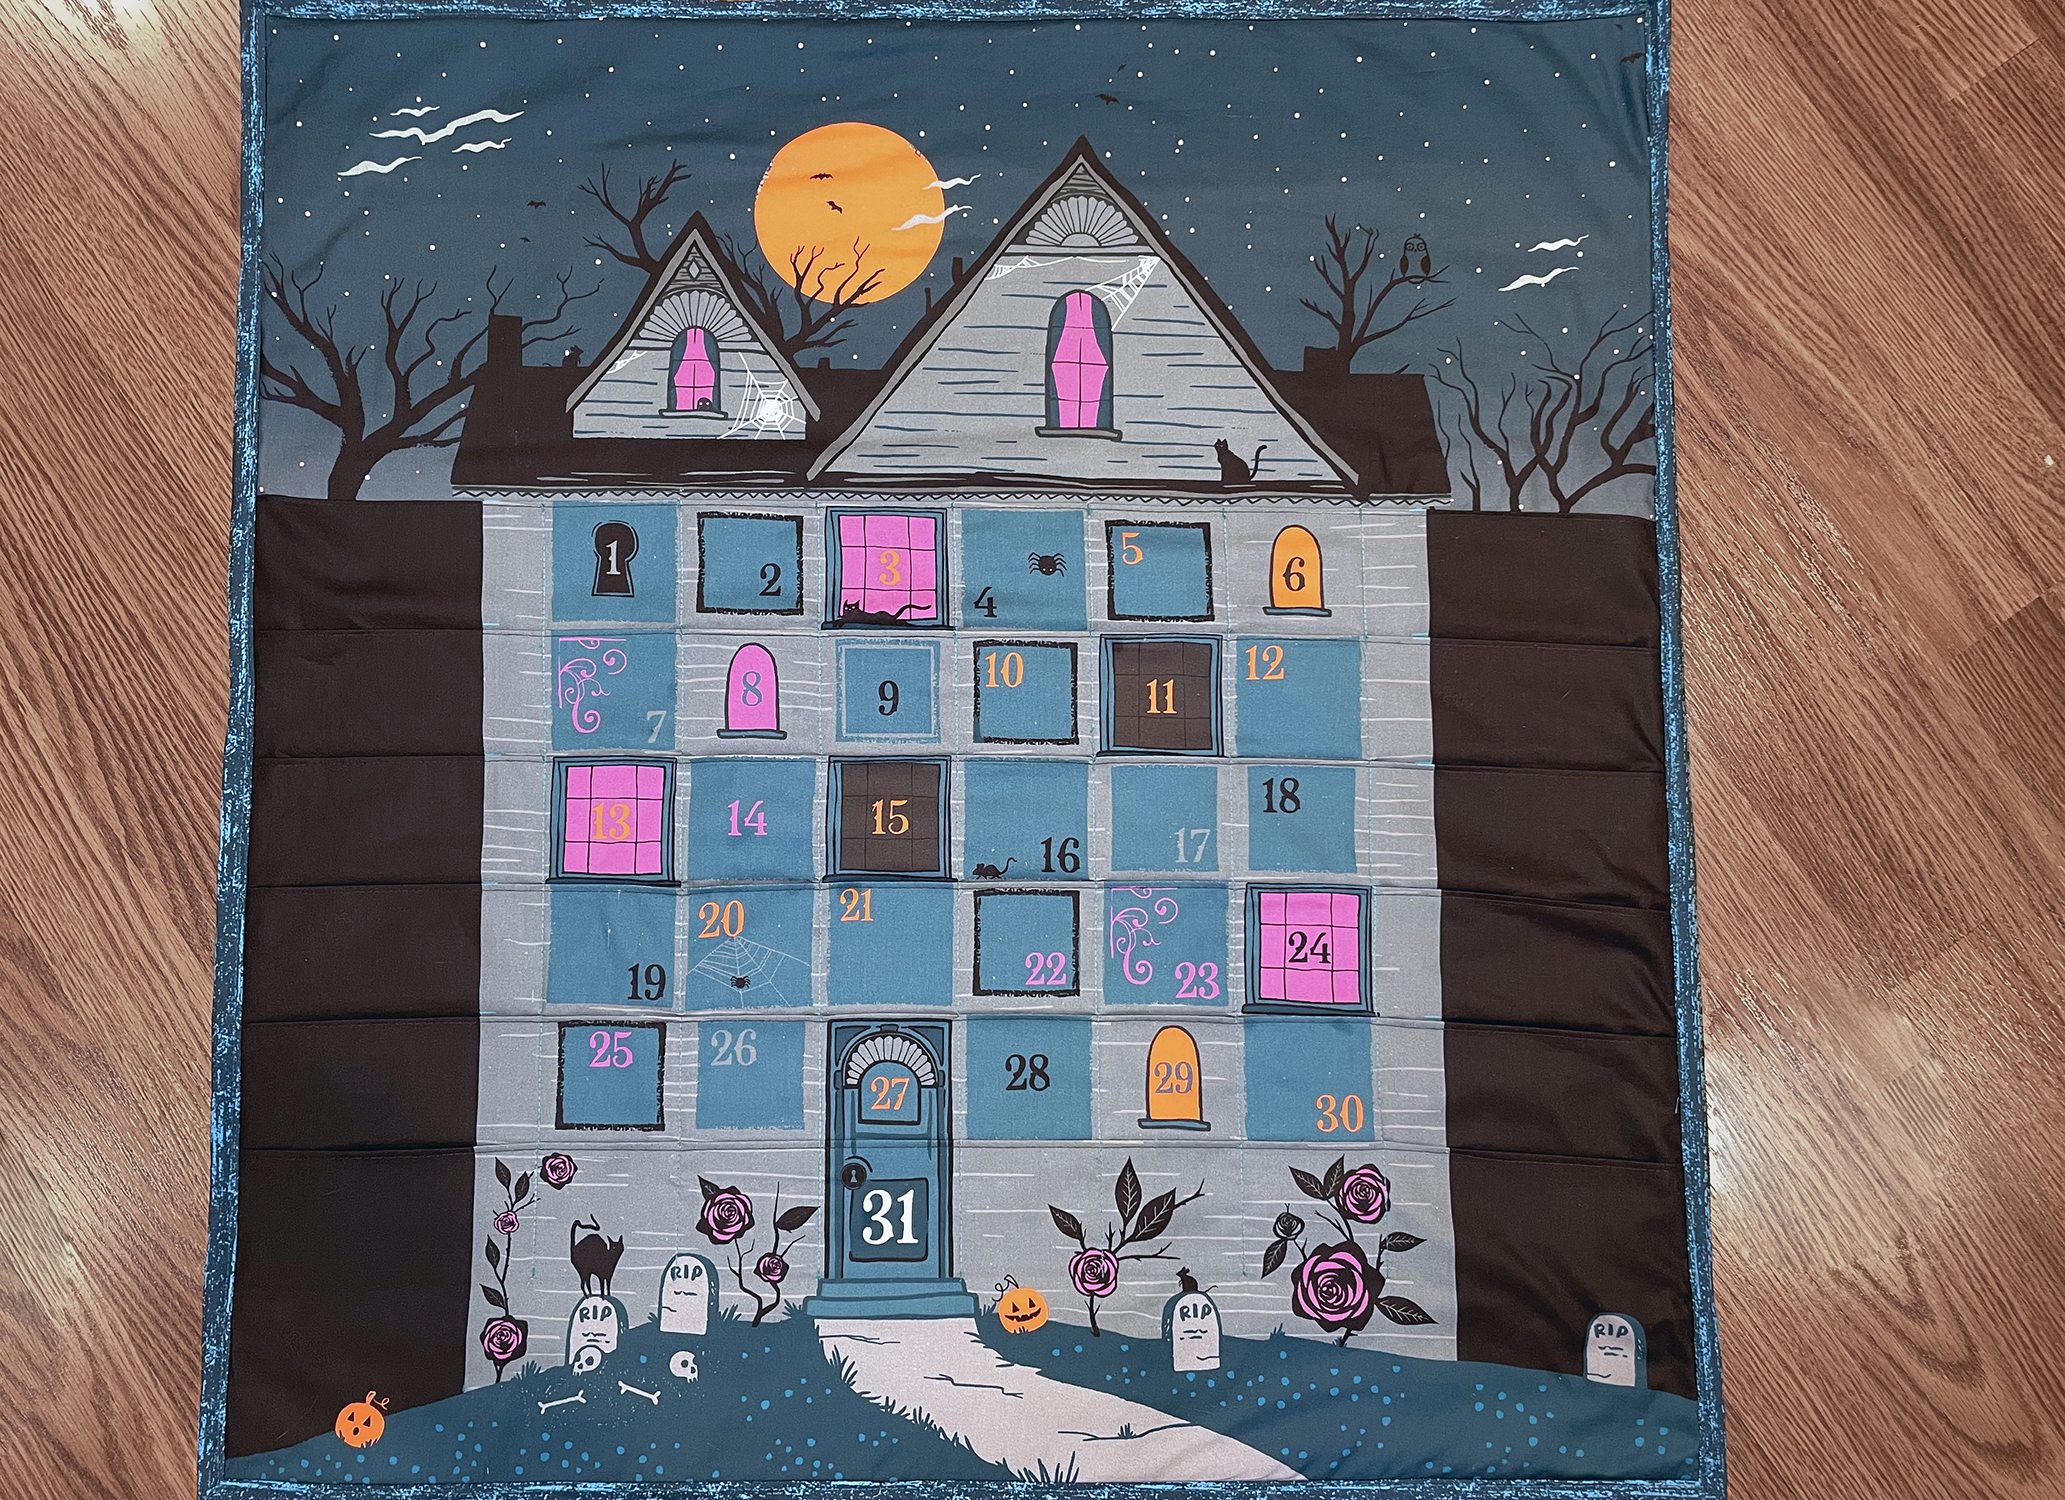
Welcome to our Candy Please! Spooky Sewalong Part V: The Final Chapter. That's right, it's the MAIN EVENT. Today, we are going to sew up up the Countdown Calendar, so you can fill it with prizes and have fun counting down the days to the best hallow-day ever, HALLOWEEN! You can find the Candy Please! Project Panel at fine retailers of Moda Fabrics nationwide. For today's steps we're going to need the following supplies:
- The Countdown Calendar section of the Candy Please Panel
- About a yard of coordinating fabric for backing
- About half a yard of coordinating fabric for binding
- OR Premade Doublefold Bias Tape
- About a yard of quilt batting. I used Warm and Natural but it doesn't have to be that heavy.
- Sewing Supplies! You know, scissors, thread, pins or clips, a sewing machine, all the classics.
- A snack of your choice. Today I'm eating candy corn.

So this week might seem haunting and daunting if you haven't had a lot of experience accordion folding or pleating fabric, but, I promise, it's really easy! So along the sides of the haunted house, you'll see all these blue words that say either FOLD or MATCH. At each line that says FOLD, you're going to pinch a fold with the fabric wrong sides together and press all the way across. I like to do all the FOLD lines like this first. Optionally, you can take these pressed folds and topstitch an 1/8" away from the folded edge. This reinforces what will be your pocket edge, and I also think it looks nice, but it's up to you.
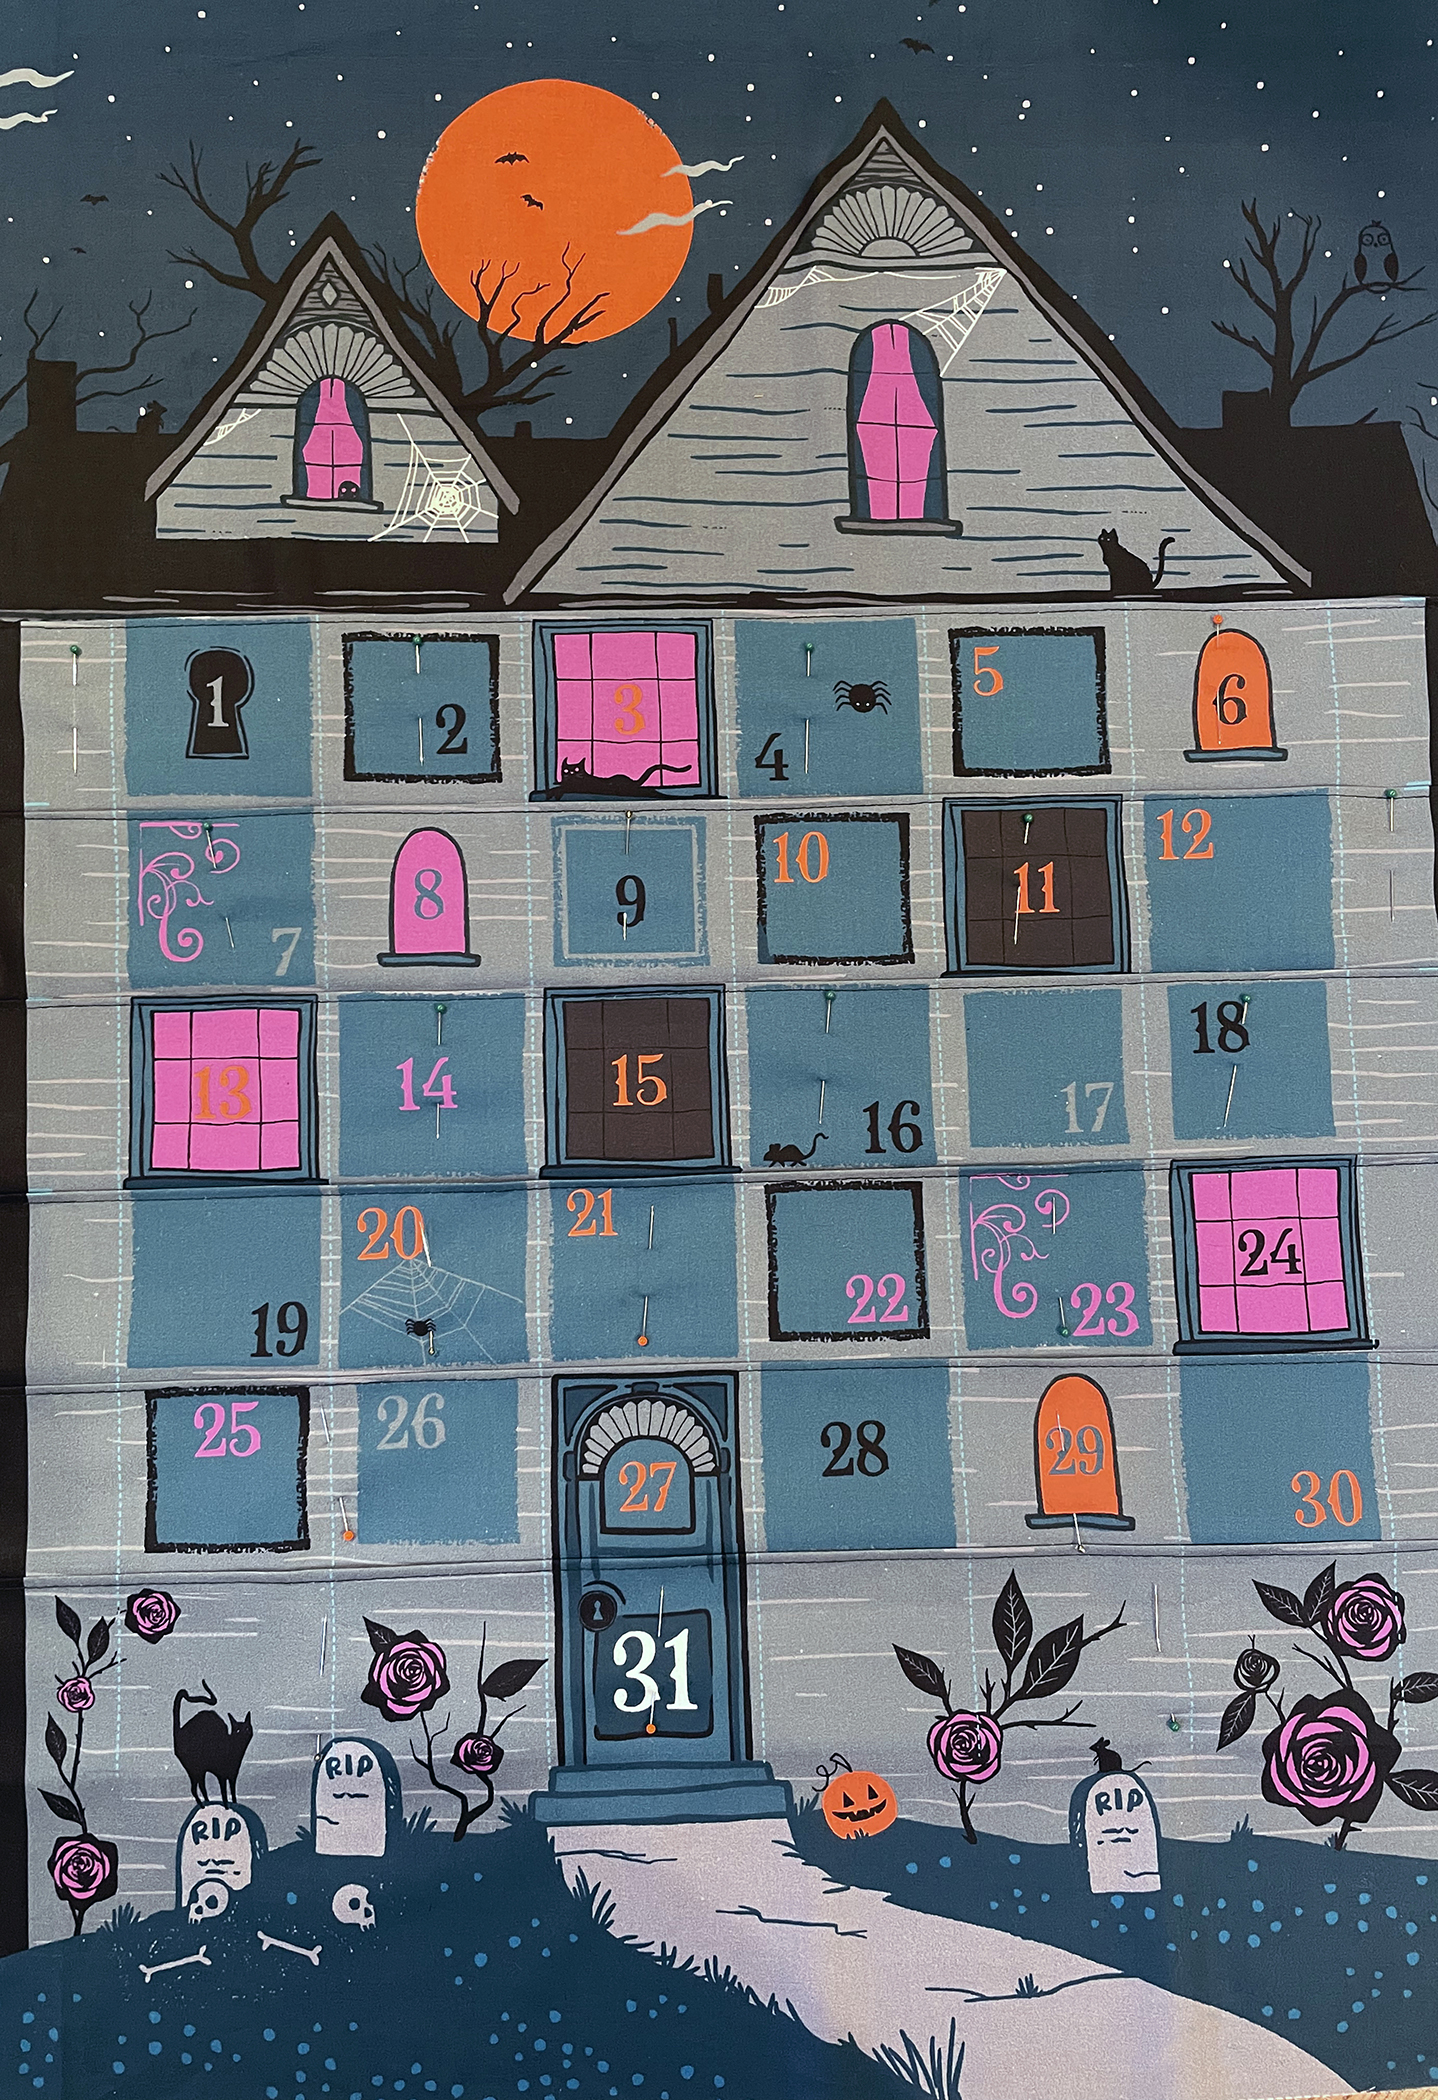
Once you have all your FOLD lines pressed, take each pressed foldline and match it up with the line above it that says MATCH. See how it gives you a long pleat pocket all the way across? Go ahead repeat this process and press each pocket as you move your way down. I also like to pin along each pocket as I go to make sure everything is held in place. Optionally you can baste with a long machine stitch along both vertical edges to really hold those pleats together for the next step.
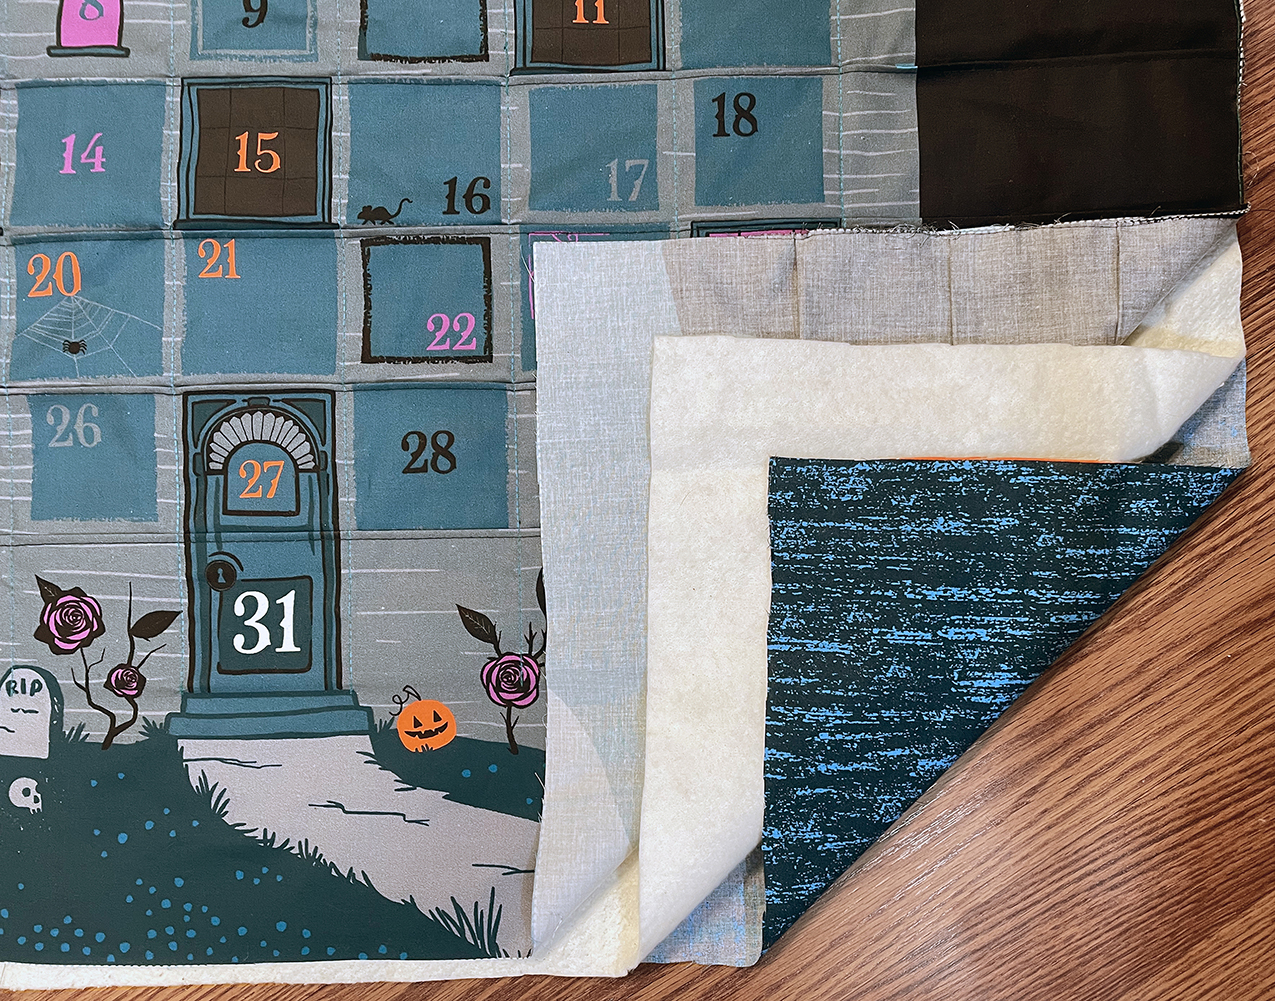
Now, using your pleated front panel as a guide, cut out your backing and your batting an inch or two larger on all sides than the front, in case anything moves around while we sandwich them together. Layer the pieces together with the backing right side down, the batting in the middle, and the front right side up. Pin all the pieces together. To form each individual pocket from our pleats, we're going to stitch along each of the vertical dashed lines from bottom to top, backstitching at the beginning and ends of the lines to secure. I used a matching blue thread to kind of camouflage the printed line. Go ahead and trim away the excess backing and binding and square up any untidy corners. Eeeee, it's coming together, are you excited? Okay, so now you baste all the way around your calendar sandwich. This keeps things nice and tidy for binding.
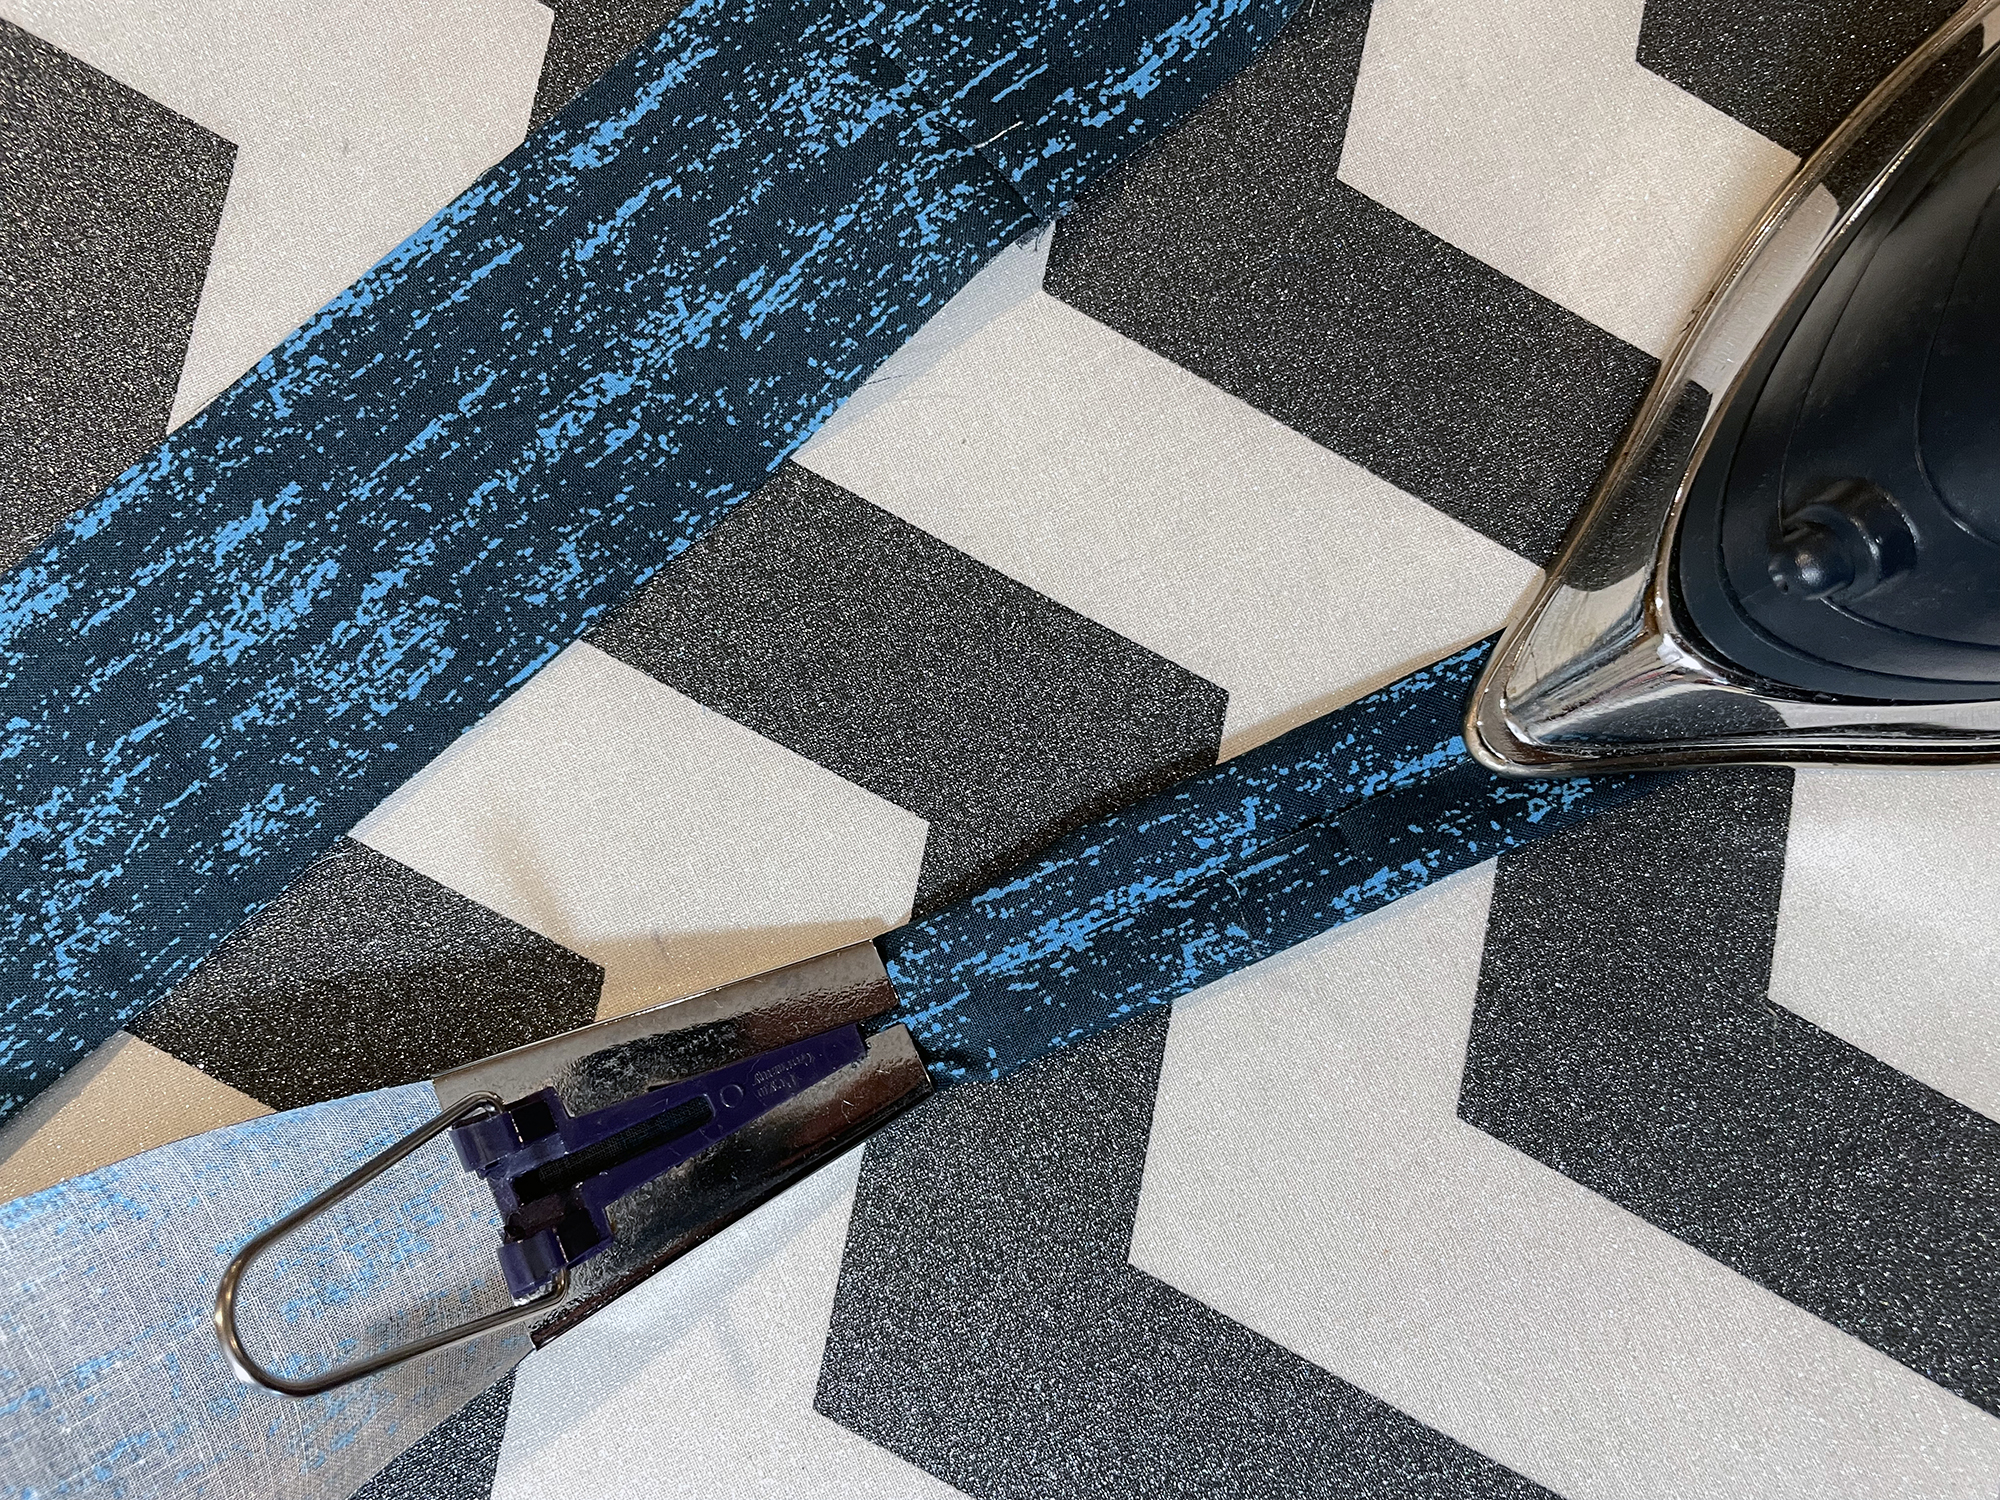
Speaking of binding, just like for the pennants, you can absolutely use premade double fold bias tape for this project. I made my own to match by cutting 2 ¼” wide strips of coordinating fabric. I stitched the short ends of the strips all together (RST at ¼" seam allowance) to form one long mega-strip. Then I fed the entire length through my handy bias tape maker. As the tape emerges from the skinny side of the bias tape maker, the long raw edges will be pressed towards the center. Go ahead and follow along with your iron and really set those folds. Then when you've completed the whole strip, fold it in half one more time, lengthwise, and press to contain the raw edges. For this project I needed about 4 yards of binding.

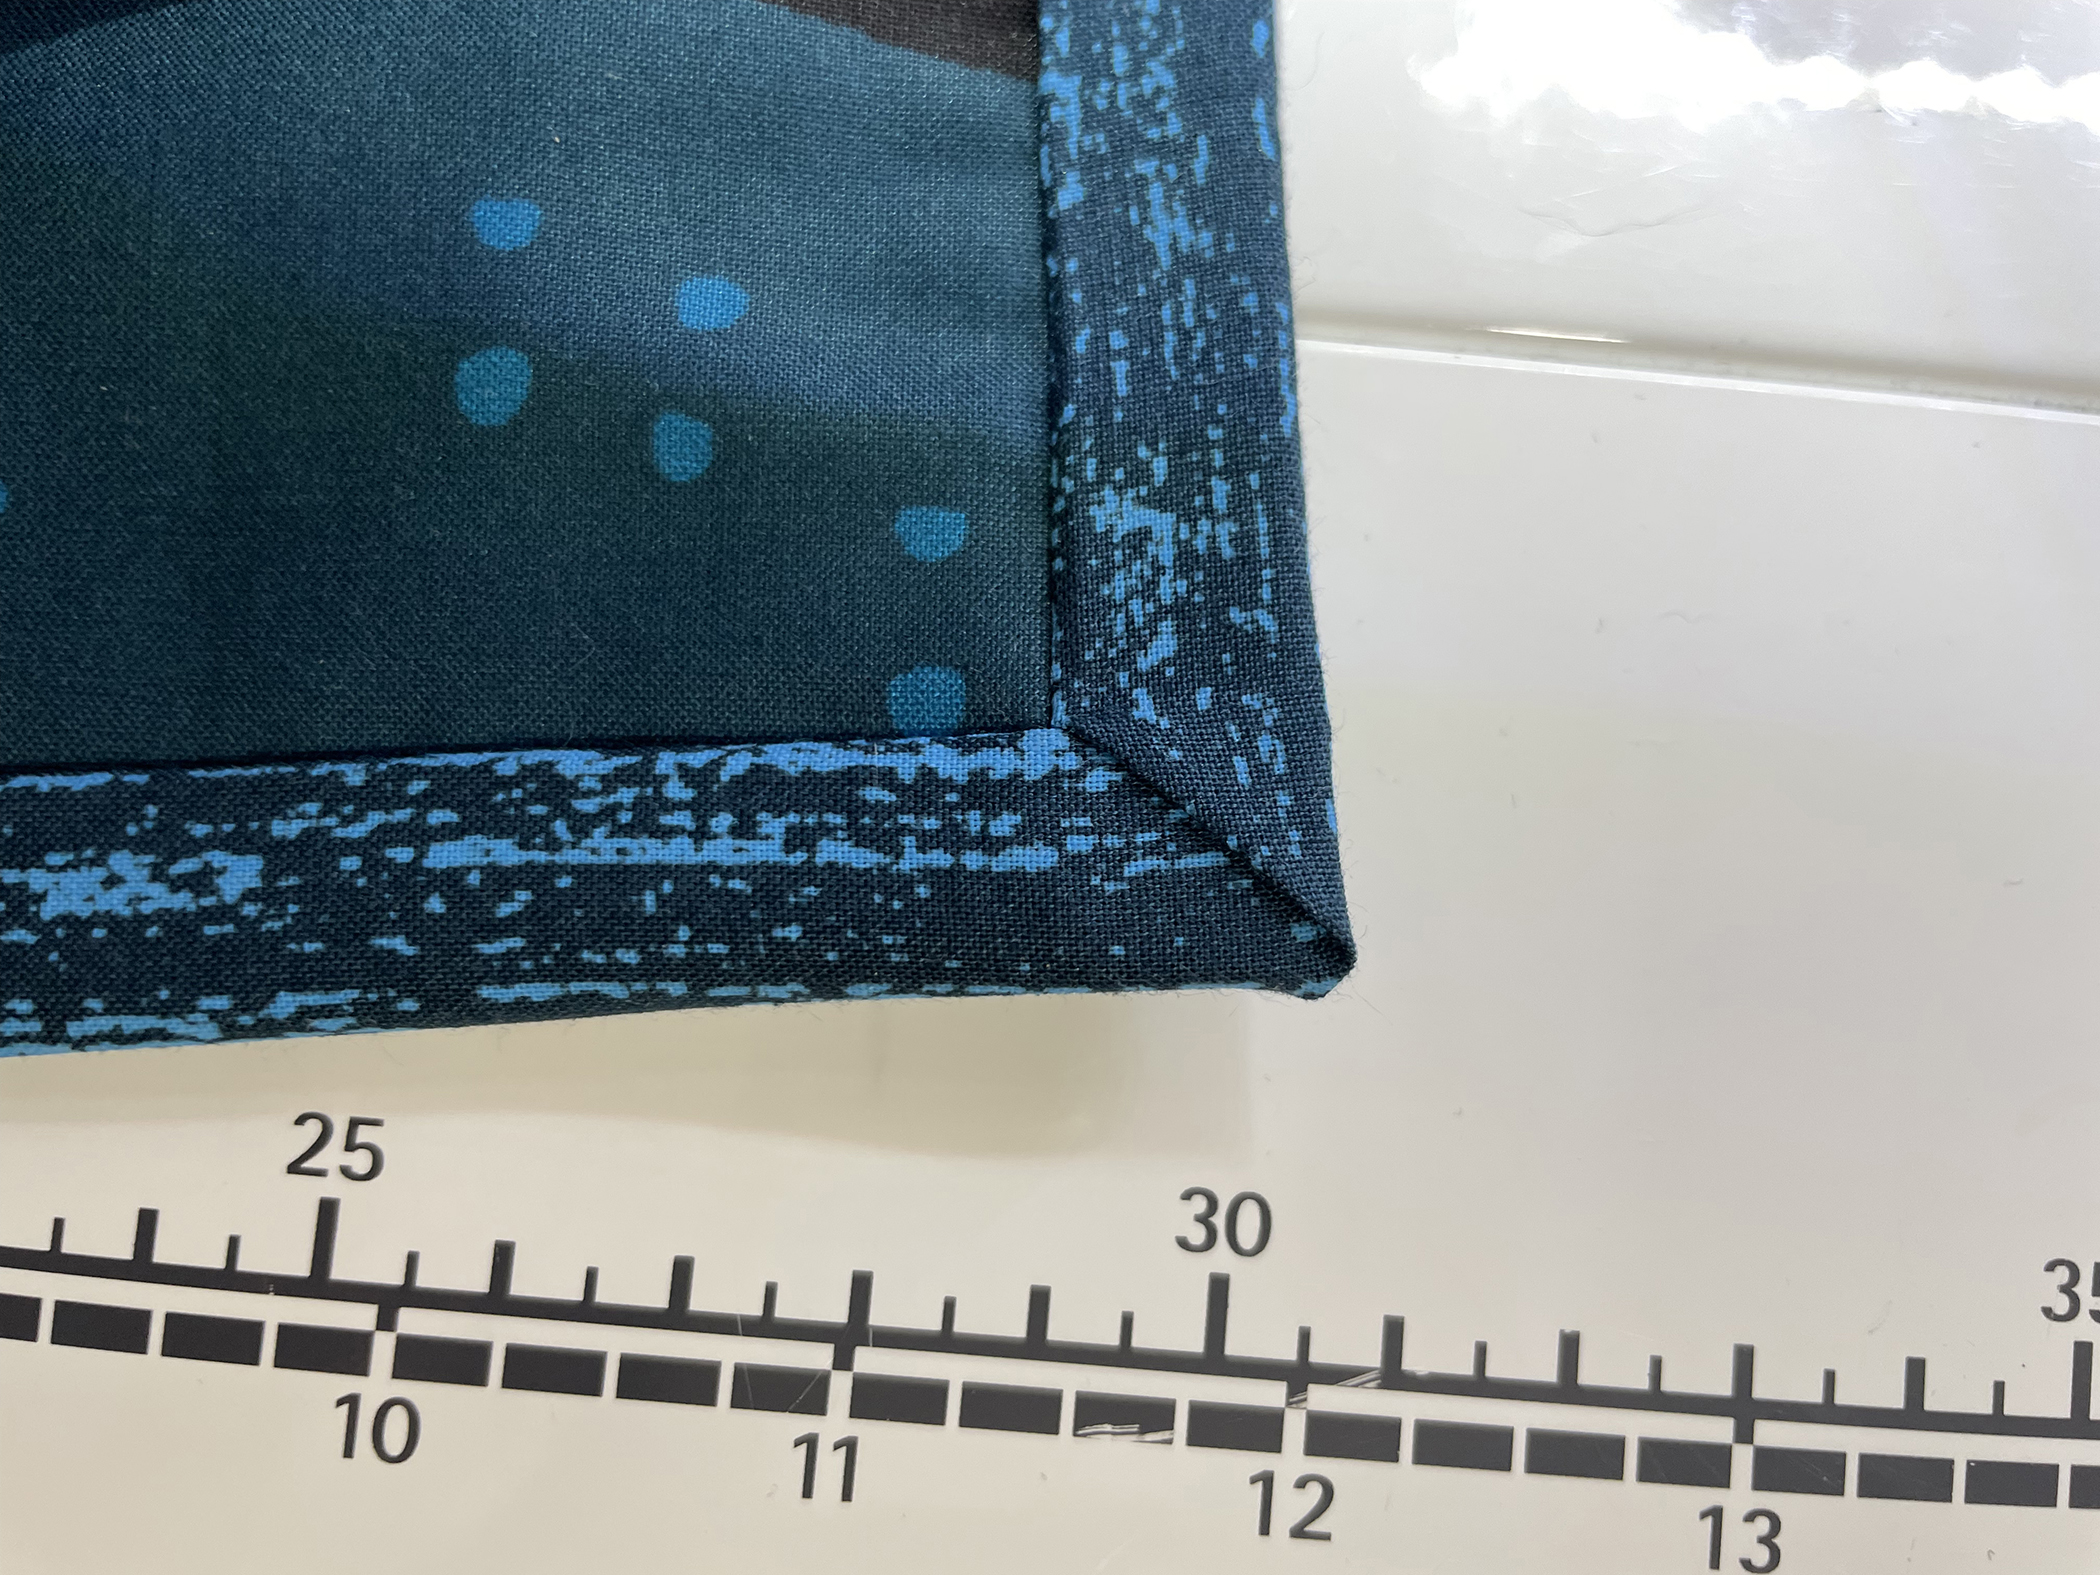
So to attach the binding, I like to open up my folded binding and fold one short edge under about a half an inch and press all the way across. I like to choose a starting/stopping place a few inches from a corner so I have room to maneuver at the end. While leaving the binding unfolded, I match the long raw edge along the edge of the calendar sandwich, stitching along the way and stopping about a half an inch before the corner. The seam allowance here is a little dependent on your binding width if you made your own like I did, but let's say around 1/2" When you get to your stopping place before the corner, backstitch and cut your threads. To miter the corner, pull the binding tail to the right, squaring the edge up with the bottom. See how there's a diagonal fold forming? Then bring the tail back to the left, sandwiching that diagonal fold underneath. Go ahead an pin or clip this edge, rotate your quilt sandwich, and start stitching again from the top all the way down the edge and stop about half and inch away from the bottom. Keep repeating these corners until you get back to your starting place. Keep stitching binding over top of your short folded edge from the beginning. After a few inches of overlap, back stitch and cut off any remaining binding tail that you have. Phew! Halfway there!
Flip your binding around to the back edge and clip it in place, tucking the raw edge of the sandwich into the center fold. The remaining free folded edge should line up and just pass your stitching on the back side. Pay attention to those corners as you clip along. See how they're nice and mitered diagonally? On the back side you might have to tuck a similar diagonal in, but it should go without too much fuss. When everything is wrapped and clipped or pinned, either machine stitch close to the folded binding edge or whipstitch by hand for an invisible look. Tada! Pat yourself on the back! It was a lot more steps than the other projects, but you did it! You have a completed Countdown Calendar! Tuck goodies into the pockets and you're ready to countdown the days to a very Happy Halloween!
So there you have it! Bunches of sewing treats that you made on your very own for Halloween! Thanks so much for sewing along with me! I hope you had as much fun as I did making buntings and pillows and softies and this Calendar. Spooky season is my very favorite and I feel extra prepared this year. From all of us at Craftedmoon's School for Misfit Makers, HAPPY HALLOWEEN!

Jane Youn is an artist, artisan, and adjunct Professor of Sewing here at the School for Misfit Makers. She lives in the Mitten State, and loves spooky things, cats, snacks, and crafts. You can follow her @janeyouniverse on Instagram.

News
Welcome to our blog. Here you will find current happenings and helpful resources. The blog is written by The Elder Cat, our resident grump who is jaded from living for over 300 years. Nonetheless, she is loved and knows many things. -Sarah Watts
Recent Posts
